• About
    • Contact
  • Community
  • Adulting & Afraid

  • Categories
    • Nagging Tasks
    • Self
    • Organize
  • Project

Wall Jewelry Organizer

What you need:
  • Old clothes hanger *
  • Duct tape * or another way of hanging (command hooks, nail & hammer, so on)
  • Paper clips *
  • Your jewelry (include your earrings too!)
Timeframe: <15 minutes (depends on how indecisive you are)

I made this a couple of months ago and I'm still using it -- which says something, doesn't it? (Mostly because I get tired of things quickly!)

How to make your jewelry organizer:
  1. Decide where you are going to hang your jewelry organizer.
  2. Bring out all of your jewelry. Depending on how many pieces you need to hang, you may need quite a lot of paper clips. Begin carefully hooking paper clips onto the hanger. You don't want to bend them too much -- because once they're bent, they're hard to get back into place.
  3. Once the paper clips are on, carefully hook your necklaces, bracelets and whatever else you choose/will fit onto them. I don't have very much jewelry, so this didn't take me very long.
  4. Hang on the wall, either using duct tape or another method. And voila! It's complete!

Modifications

Don't have a spare clothes hanger laying around? Perhaps you have one of the items below. :)

  • Ribbon (thinner would probably be better, so you can hook your paper clips on it without too much struggle). You can pin, nail, tape or hang the ends to the wall so that the ribbon is nice and taught. That way, your necklaces don't sink to the middle.
  • String (same thing as the ribbon - keep it taught)
  • Wire, yarn, thin metal rod, wooden dowel... Keep your creative mind open!

BONUS: Earring Braid

What you need:
  • Yarn or thick string
  • Safety pin (for convenience)

How to make it:

Measure and cut three strands of yarn or thick string to your desired length. Your braid will be slightly shorter in comparison to the strands individually so you may want to cut them just a little longer than desired. I cut my string to about 17 inches each (only because I wanted to use it up so it wasn't taking up space).

Now line up your strings and poke a safety pin through the end of each. You should now have one end of each string on your paper clip. Close the safety pin, tie a knot as close to it as you can get, and then begin braiding. You want your braid to be on the looser side so you can poke your earrings through.

When you're finished, knot the end, trim if necessary, and hang on one of the paper clips. Poke your earrings through and you're done.


Timeframe: <5 minutes (depends on length of braid)


Modifications
I used this for earrings that have posts (they're straight and have the backing you have to slide on them to keep them on the ear), but I'm sure you could thread wire earrings through the braid as well. If you're not comfortable with that, you can hang the earrings along the hanger (/ribbon/wire/etc.).


WHAT DO YOU THINK? Does this DIY seem doable? Make sure to share YOUR version with me @adultingandafraid (Instagram)!

Share
Tweet
Pin
Share
2 comments


Before you get started

  1. Take apart the bag
    1. First, remove the straps by using the tip of your scissors to break the thread that keeps it in place. Do this to all the straps on both sides. You should end up with two short straps, two long straps and the bag itself.
    2. Next, find the seam on the SIDE of the bag and use your scissors to break the thread at the top. Be careful not to cut or rip the bag. Work your way down until you get to the seam at the bottom of the bag, then do that too. This was fairly easy and quick for me, but if you have trouble DON'T TUG. You run the risk of ripping the bag. Instead, snip at the thread with the scissors and keep pulling the two sides apart to create a tension that shows that still keeping everything attached.
  2. Keep ALL the pieces
    1. I even kept my tag. Just in case. ^.^

The pieces you'll end up with (NOT EXACT MEASUREMENTS):

  • Body in two pieces:
    • Large (sides): 70 in. by 15.5 in.
    • Small (bottom): 21 in. X 13 in.
  • Straps:
    • 2 long: 29 in. each
    • 2 short: 12 in. each

#1 - Hanging Mason Jar

What you'll need:
  • Thread & sturdy needle OR if you prefer a sewing machine
  • Pins
  • Scissors
  • The longer of the two body pieces of the bag (side)
  • Mason jar
  • Ruler or measuring tape
  • Pencil/marker
  • Paper
  • Ribbon


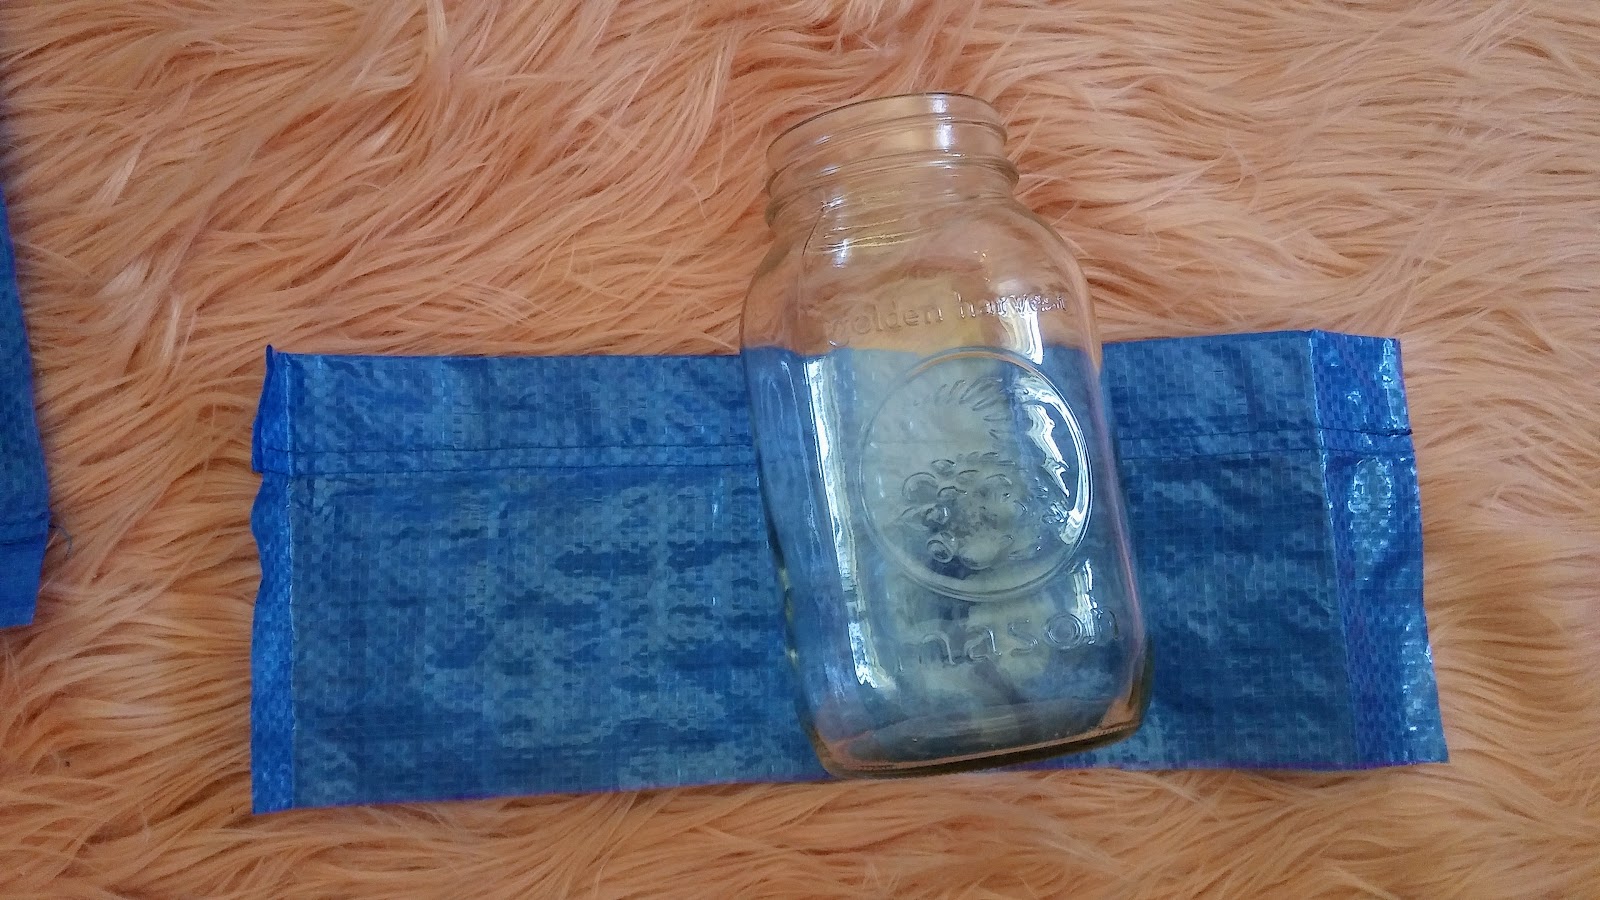
These were the measurements of my mason jar:

  • BASE: 3.5in x 3.5in
  • HEIGHT: just under 7in

Knowing the measurements of my mason jar, I laid out the long piece of IKEA fabric and measured a strip that was about 5.5 inches in height (shorter than the mason jar so I could see the top of it peeking over the edge of the bag) and 16 inches long (because the jar is 3.5 by 3.5 I take the perimeter [3.5 times 4 = 14] + 2 inches and use that as the length, so that my square base with fit within it when it's sewn).


Before I cut, I measure everything out with a ruler and a Sharpie, making sure that the top edge of the bag -- the part that is hemmed over -- will be the top of my mason jar's new little home.

Then I cut.


With the fabric left over, I measure out the square base of my mason jar. The measurements were originally 4 in. by 4 in., but I later cut it down to 3.5 in. by 3.5 in. (Oh the joy of completely winging it.) 


Next, I pinned the square to the bottom of the sides, with "right" sides facing together (this was so the stitching wouldn't be visible when I turned it right side out). As expected there was a little bit of over hang at the sides, which I kept (just in case!). I also pinned the sides together.


Then I threaded my needle, knotted the end and began sewing along the bottom. I used what is called an Overcast Stitch. I pushed the needle in through the back, pulling it towards me. I repeat this on all the stitches, pushing through from the back and pulling it through to the front.

I great example of this stitch is found in this blog post by Miss Sews-it-all.

After the bottom was finished I moved up the side. This part was trickier because I wanted to sew it so that the thread wouldn't be visible at all when turned right side out again. Catching enough fabric but not too much is difficult, so take your time. I also made sure to only sew one side of the hemmed edge -- you'll see why in a moment.

If you're not into hand sewing, feel free to use a machine. But not everyone has one and I wanted to see if this would hold together if I did it this way. :)

When I was done sewing I knotted the end a good few times and turned it right side out. I have to say I was pleased it didn't rip -- I was pretty rough with it. XD


Next, I measured 4 equal points along the rim of the "bag" and made cuts on the outside edge only. Like this:


See how the cut isn't through both layers? Only the outside.

Then I took my ribbon (12 inches each) and threaded it through. How long your ribbon should be depends on where you're hanging the jar. If it's up high and you won't need to reach it, shorter is better. But if you want it to be accessible, take into consideration how long you're going to need it to be.


Basic steps:

  • Measure your mason jar.
  • Cut out a strip of fabric for the side and bottom.
  • Pin right sides together.
  • Sew.
  • Turn right side out.
  • Check the mason jar's fit.
  • Create 4 slits along the rim.
  • Thread ribbons through and knot them together.
  • Hang and enjoy!

If you made it this far, comment "IKEA for the win". ;)

#2 - IKEA Choker

What you'll need:
  • IKEA Bag strap (long)
  • Elastic (1 inch wide)
  • Lighter (for the ends of the ribbon)
  • Sewing machine OR needle and thread
  • Measurement of the circumference of your neck (mine was 12 inches)
  • Velcro


With the measurement of your neck (one does not get to say that often, hm?), cut down the long IKEA bag strap to 7 1/4 inches.

I made sure to cut mine so that the IKEA was the center and there were seven lines as a margin on each side.


Using your neck measurement, subtract the length of the strap (round down to 7 inches) to get the measurement for the elastic you'll need (13 - 7 = 6).

The total length of my choker was 13 inches. The ribbon was 7 1/4, while the elastic was about 3 inches on each side when I included the room for velcro. (7 + 3 + 3 =  13)


Here is what it look like pinned together.


Next, I peeled the velcro off its little cardboard home and placed it on the ends so that when the two ends met, they would catch on to each other.


I placed the softer side toward the skin, and the scratchier side away from the skin.


I got tired of the frayed ends of my ribbon, so I took a lighter and very gently ran it along the ends to seal them up.


Now to sew the elastic to the ribbon! I tried to choose a place where the thread (mine was black) wouldn't be too noticeable, and settled on sewing into one of the lines the ribbon had on it. (Pictured above)

I used a stitch called a back stitch to make the bond really secure and strong. I want my choker to keep up with the wear and tear of, well, wearing it.

And that's it!


Elastic is secured!

Basic steps:

  • Measure neck
  • Cut ribbon to about 7 inches long, with the IKEA logo as the center.
  • Use a lighter to slightly melt the ends of the ribbon and keep them from fraying.
  • Subtract ribbon length from your neck measurement to get the length of elastic you will need.
  • Divide this number by 2.
  • Cut elastic to the divided length.
  • Pin to ribbon.
  • Sew using a back stitch.
  • Apply velcro.
  • Wear!

And that is all!

What will you make with your IKEA bag? Let me know in the comments!

    Share
    Tweet
    Pin
    Share
    1 comments
    New experiences include experimentation and stepping outside your comfort zone. Deconstructing this clock to turn it into something new -- without a guide other than my intuition -- was definitely a new experience for me.


    What I used:

    • Old clock
    • Paint - I used wall paint in the color Scottish Green by Dutch Boy
    • Paint brushes
    • Screwdriver
    • Scrapbook paper
    • X-acto knife

    How I did it:

    1. First, I took the whole thing apart. You can see in one of the following pictures, the glass -- which I totally got fingerprints all over -- and the ring around the clock that I removed.
    2. Next, I painted the outer plastic ring the color I wanted -- mint green. I let it dry then painted on another coat to make it truly opaque.
    3. The next thing I did was take the clock hands off the body of the clock. This led to the discovery that the numbers on the inside of the clock were printed on to a sheet of paper. The original plan had been to paint it, but instead, I ripped it out as carefully as I could and traced around it on a sheet of scrapbook paper I wanted to use as my new background. Then I cut it out, making sure to poke a hole in the middle for the clock hands to go through.
    4. Next, I searched the Internet for inspiration. I settled on putting just the quarter hours (12, 3, 6 and 9) on the clock. So I printed out a sheet of numbers to stick onto the background I cut out, but when I went to cut them out, the colors I had chosen didn't quite give me that "this is right" feeling. I experimented with coloring over them with metallic Sharpie and that looked great. I loved it. The problem? I got Sharpie on my scrapbook paper! Eek! I tried to play it off and make it look like it was sprayed on, but that only made things worse. So I chose some new paper, used the stencil to cut it out and started over. This time, with no Sharpie.
    5. On some grey textured scrapbook paper, I stenciled numbers. My mother cut them out with an x-acto knife (a long, tedious process) and I used glue dots to stick them in place.
    6. Once I was happy with how everything looked, I put the clock back together.

    This is how it turned out...

    Before: 


    After:


    All in all, I am really happy with how my clock turned out. It took me a lot longer than originally intended, but that's the way projects go sometimes. You just have to take things as they come and adjust from there.


    Photos I took along the way:


    Painting the outer rim of the clock.
    Using paint sample containers to hold down the original clock background as I traced it out.


    My new clock background.


    Experimenting with the clock numbers.


    Have you ever started a project and it ended up taking longer than expected?

    How did you handle the hiccups along the way? Let me know in the comment section below. :)
    Share
    Tweet
    Pin
    Share
    4 comments


    What you need:

    • Thick paper in pattern/color of choice
    • Paper clips
    • Glue stick
    • Ruler
    • Pencil
    • Patience + basic math skills

    Timeframe: <10 minutes


    How to make it:

    Note: Instruction number lines up with where the photo appears in the order.
    1. Gather your supplies.
    2. From every corner of your paper measure and mark an inch.
    3. Rotate your ruler 90 degrees and mark an inch in from your original mark. You should now have markings that create square inches at the corners of your paper. (See photo for clarification.)
    4. You should have four lines that are a square inch across the paper.
    5. On one side of your paper, line your ruler up with the lines you've made.
    6. Use your ruler to help you fold the paper in a straight line.
    7. Repeat with the other 3 sides.
    8. Fold all four sides in on each other to check that everything lines up and is to your liking.
    9. Going back to the lines you marked before, carefully cut along them. You should have four flaps you can fold in. (Refer to photos)
    10. Apply glue to one of the folds.
    11. Press fold to the outside of the flap next to it.
    12. Slide on a paper clip to hold the paper down while the glue dries.
    13. Repeat to all sides.
    14. You're done! Place jewelry inside and marvel at your wonderful work.


    Did you make this? Share your catch all on social media and don't forget to tag me!

    Share
    Tweet
    Pin
    Share
    No comments
    Older Posts

    Created with by BeautyTemplates | Distributed By Gooyaabi Templates